> ## Content Index
> Fetch the complete content index at: https://cronoxyd.de/llms.txt
> Use this file to discover other available public pages before exploring further.
# .NET MAUI Blazor workbench app template
- URL: https://cronoxyd.de/net-maui-blazor-workbench-app-template/
- Published: 2023-05-21T16:18:18.000Z
- Updated: 2026-08-01T15:02:36.000Z
- Author: Marcel Diskowski
- Tags: Coding
This guide details how to create .NET MAUI Blazor workbench-style app.
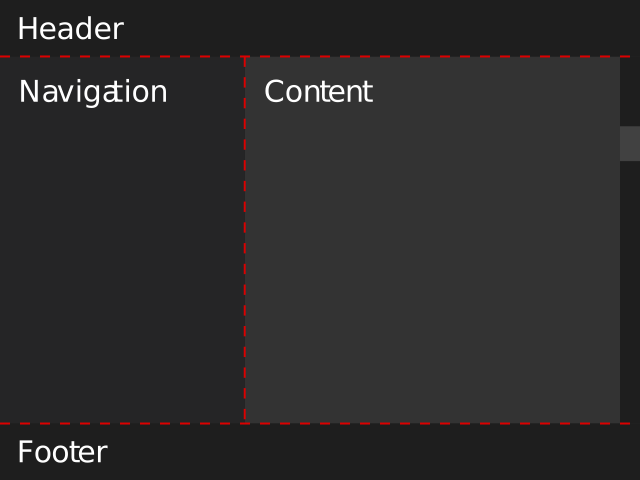
By workbench-style app I mean an application that is akin to most classic desktop apps, where there is:
1. a fixed header that usually contains a menu stip or ribbon,
2. a main content area which often has a tree view or other navigation on the left and the actual content on the right and finally
3. a fixed footer that usually contains status messages and context information.
## Starting point
When creating a new .NET MAUI Blazor app, the `wwwroot` directory is populated with a boilerplate HTML page that hosts the Blazor content which consists of:
- wwwroot
- css
- bootstrap
- (bootstrap assets)
- open-iconic
- (open-iconic font assets)
- app.css
- index.html
Additionally, some Razor components also provide styling using a `.razor.css` file.
First, we're gonna focus on the `index.html` and its essential components:
```html
```
## Cleanup
### Framework-internal elements and styling
The actual framework-relevant elements whose styling needs to remain are:
- `div.status-bar-safe-area`,
- `div#app` and
- `blazor-error-ui`.
So we pack their CSS styles into a special stylesheet (the `div#app` actually has no boilerplate code) and call it `blazor.css`:
```css
#blazor-error-ui {
background: lightyellow;
bottom: 0;
box-shadow: 0 -1px 2px rgba(0, 0, 0, 0.2);
display: none;
left: 0;
padding: 0.6rem 1.25rem 0.7rem 1.25rem;
position: fixed;
width: 100%;
z-index: 1000;
}
#blazor-error-ui .dismiss {
cursor: pointer;
position: absolute;
right: 0.75rem;
top: 0.5rem;
}
.status-bar-safe-area {
display: none;
}
@supports (-webkit-touch-callout: none) {
.status-bar-safe-area {
display: flex;
position: sticky;
top: 0;
height: env(safe-area-inset-top);
background-color: #f7f7f7;
width: 100%;
z-index: 1;
}
}
```
### Extraneous styling
Next, we delete all other styling, specifically:
- `Shared\MainLayout.razor.css`
- `Shared\NavMenu.razor.css`
## Building the workbench-style
### HTML
On the component, we overwrite `Shared\MainLayout.razor` with:
```html
@inherits LayoutComponentBase
@Body
```
### CSS
Finally, we overwrite `wwwroot\css\app.css` with the workbench style, which I will describe blockwise:
#### Box sizing
One quite common practice is to set the `box-sizing` CSS property of all elements to `border-box` which forces uniform handling of sizing, margins and paddings:
```css
* {
box-sizing: border-box;
}
```
#### DOM root elements
The DOM root elements, `` and `` need to be stripped of their default margin and padding:
```css
html,
body {
font-family: sans-serif;
margin: 0;
padding: 0;
}
```
The setting of the font family is optional of course.
#### App/page frame
The `div#app` and `div.page` elements which reside in the `index.html` and `MainLayout.razor` respectively, define the frame for the actual workbench elements. And we're gonna be using the CSS grid system to define the sizes of the nested elements.
```css
div#app,
div.page {
height: 100vh;
width: 100vw;
}
```
#### Header footer padding (optional)
Since the header and footer often contain only single-row text or other similarly-sized content, we specify a small padding:
```css
header,
footer {
padding: 0.25rem;
}
```
#### Area borders (optional)
So differentiate the areas of the layout, we define some borders:
```css
header {
border-bottom: 1px solid lightgrey;
}
aside.sidebar {
border-right: 1px solid lightgrey;
}
footer {
border-top: 1px solid lightgrey;
}
```
#### Grid systems
The following are the most essential rules to create the workbench layout:
```css
div.page {
display: grid;
grid-template-columns: 1fr;
grid-template-rows: auto 1fr auto;
}
main {
display: grid;
grid-template-columns: 1fr 3fr;
overflow: hidden;
}
```
Remember that the `div#page` element contains the `header`, `main` and `footer` elements and therefore needs to define a row-based layout. The `main` element then contains the navigation sidebar and the actual content area.
The `grid-template-rows` and `grid-template-columns` properties define relative and absolute sizes for the rows and columns within the grid.
The `fr` CSS unit was new to me when I first researched this topic. According to the [MDN documentation](https://developer.mozilla.org/docs/Web/CSS/flex%5Fvalue?ref=cronoxyd.de) is specifies "a fraction of the leftover space in the grid container".
#### Scrolling content
The final essential rules are for the content area that enable the scroll of overflowing content:
```css
article.content {
overflow-y: scroll;
padding: 20px;
}
```
#### Preventing statup focus border
When the .NET MAUI app starts, it has the focus set on the first element of the content which, by default, is a `h1` heading on the `Index.razor` page. This causes a focus border to be drawn. We can disable this behavior:
```css
h1:focus {
outline: none;
}
```
## Flexibility
You may have noticed that the content of the Razor pages is confined to the `article.content` element which may not be suitable for every use-case. But you can easily define which elements are defined in the `MainLayout.razor` and which are defined in the individual pages. Only remember to move the `@Body` directive so that the content gets inserted again.
The following is an example of a layout that is more suitable for apps that shall support multiple views which have control over their own layout. Program-level code may then populate the `